Pages

Beautiful things for you and your home!

Lots of homely thoughts on sewing, baking, papercrafts, gardening and all the things that go towards making your house a home

Sunday, 23 December 2012

Handmade Christmas Wreath

In a previous house, we always had a beautiful fresh wreath on our door at Christmas. Every year I'd stop at the teeny weeny nursery I'd pass on my way to and from taking the pooch out on the forest, and hand over a fiver for a large, fresh, totally handmade wreath. Even then it was a total bargain!

Out on a walk the other day, I passed someone in a layby selling wreaths, again for a fiver. They were tiny! I'm sure it'd look fine on Bilbo Baggin's front door, but on any normal size door, it was sure to look a bit out of proportion. And I certainly couldn't afford the prices they were charging in the shops for anything of a decent size. I do love the look of a real wreath but, due to being laid up ill for a good ten days, there wasn't much opportunity to get out there and grab the leaves and lovely goodness I'd need to make one myself and our own garden couldn't fulfil those needs either. But whilst recovering, I did come across an idea for a fabric wreath. It was printed in Prima magazine, but I believe it is something they've taken from a company who actually make them - for far more than it cost me!

 
What it did cost me is time, which is probably why those online are more pricey - and of course, I already had a stash of fabric to delve into! It's basically little strips of fabric and ribbon tied onto a florist's wreath frame (I got mine on Ebay, still new, but cheap). I chose one that was '3D' rather than just flat but it all depends on what you like. I also cut my strips with pinking shears to minimise fraying but if you like the frayed look, then it would certainly add texture.


It's on the inside of the door because we see it more that way and I didn't want it getting dirty at all from anything carried in the air as I certainly don't fancy untying all those bits and washing them!
 
I'm definitely pleased with how it turned out and it's something a bit different from what's in all the shops, which always makes me smile.
 
I hope you like it and I'd love to see any hand made wreaths you've made for your home this year!
 
 
Love, Maxi


Saturday, 1 December 2012

Journal Your Christmas 2012

This project is something I did for the first time last year. It's run by Shimelle Laine (who has all sorts of interesting courses both on her own website, and on the Two Peas site.

Journal Your Christmas is about taking Christmas back. Rescuing it from the avalanche of commercialism it has become buried under, and remembering what the real meaning is of it - for you. Once you sign up to the course, you are a member for life, so you'll get the prompts every year, without having to hand over any more cash - which is nice! You get prompts every day for 37 days, starting on December the 1st, and you can do every one, or just a few. You can take photos every day or none. You can journal every day or hardly it all. It's all up to you.

I definitely enjoyed creating my journal last year, even though it wasn't properly finished until (gasp!) June! I did learn from doing last year's, and am changing a few things this year. Which is apt as Shimelle has changed up the prompts.

Today was 'Manifesto' day. Whilst there is one in the handout, I created my own - mainly because I missed seeing the one that was there, but that's ok. I like what mine too.


I decided that this year I'd most likely just pick and choose which prompts to do, so I'm not numbering the days or anything. There were a few last year that didn't really 'speak' to me, and I struggled a bit with those. This way allows a bit more flexibility which I think will work better for me.
 
If you're fed up with Christmas before it's even started, thanks to supermarkets moving everything in order to make room for mince pies in September, I'd highly recommend joining Journal Your Christmas and start claiming it back.


Thursday, 29 November 2012

Sewing a Blind Hem

I did it! I did my first blind hem and it looked fine! This is something that has always baffled me because of the whole folding it this way and that thing that goes along with it. Until I found this video. It explained the folding bit so well that it made you think - what was I worrying about?

I forgot to take a picture before I gave the skirt back to my Mum (for whom I was altering it) but it really did turn out well. I was pretty chuffed with myself. I did use a blind hem foot which came with the machine and I can see that not having this would make it more difficult as you wouldn't have the little guide that special foot has.

It really has made me happy that I got this done - I've had the skirt there for ages and whilst for much of the time, I was without a machine and therefore unable to do it, I was also a bit nervous when I did have one as I didn't want to mess it up, as it's part of a suit. I unpicked the lining and just did a normal hem on that, as had been done on it originally. I nearly cheated and did a normal hem on the main fabric but I really wanted to learn the technique.

Now I have done it once, I'll hopefully be less intimidated another time.

If this is something you're struggling with, I'd highly recommend you take a look at the video I mention. I watched it at 4am whilst unable to sleep and even got it then, so that must say something about how well she's explained it!

Happy Sewing!

Thursday, 15 November 2012

New Sewing Machine - Eek!

Well, I finally decided and now have a shiny new sewing machine. I have to say that I haven't had much use of it yet, but I did actually manage to get the bobbin wound, in and working yesterday. I rummaged around and found a skirt I cut out more years ago than I care to remember - and due to that fact am not sure I'm even going to fit into anymore! :(  which is this one from New Look.

 
New Look 6300
 
As you can see, it's noted as 'Easy' which makes it even more annoying that I couldn't flippin' work out some of the instructions! I sewed the back together yesterday and it originally had a vent...well, not anymore. I'm hoping it's just because I'm out of practice and not because I'm actually being a bit dopey! So, having edged and hemmed the vent, I couldn't work out how it was supposed to lie, so I ended up hemming the back seam all the way down from the bottom of the zipper area and chopping the vent bit off.
 
The view I'd chosen and cut out is the one the model is...well, modelling in the picture. This is also throwing up issues for me. I'd cut all my skirt out of some really nice faux suede I'd got from Croft Mill years ago in brown and a beigey/creamy colour. However, when I've got to patch it together, it seems like some are going to be the wrong side up. I thought I'd cut them out wrong but having looked at the cutting layouts again yesterday, it does seem that I've followed them correctly. Which is why I ended up sewing the back together first.
 
So, at the moment, it's sitting in a pile until hubby who although not a seamstress, has a very clever and logical mind, can look at it with me and see if it's me or them. As I say, all this might be academic because I'm not the skinny girl I was so it might not even fit, but I did think that I might be able to put some panels down the side if things start looking that way, bearing in mind it's a pieced look anyway.
 
If anyone has had any experience with this pattern, I'd be happy to hear from you (more than happy!).
 
Any whilst it probably wasn't the best project to start out on a brand new machine after a long gap away from, being shiny on one side, and grippy on the other, I did at least sew a few bits of fabric to another few bits so it's a start!


Friday, 9 November 2012

Plum Crunch Cake

More baking! Although I have to admit I made this one a little while ago but didn't get around to putting it up on the blog.

It's an excellent recipe for using up some fruit that might be looking past its best a little. I actually had some plums to use up, but I should think it would work just as well with something like apricots, and even apples.


As you can see, I made two and froze one. It froze really well - no complaints when it was time to be pulled out and eaten. The recipe itself was torn from a magazine and had been sitting around for a while so I was glad of the chance to try it out.


The sugary syrup is poured one when they come out of the oven and then left to set, hence the 'crunch' part of the title. Of course, you could leave this bit out if you wanted to cut back on the sugar content.

The only downside with this cake is that it's not so great for transporting - probably not the best for lunchboxes (although hubby did manage it just fine. I can't say if all of the bits stayed on but they certainly got eaten, detached or not.)

Any other fruit you could think of that would be good for this recipe?

Friday, 2 November 2012

Chutney Surprise

I have never made chutney before but I had a bunch of green tomatoes, and a few reds one that really needed using so I went rummaging for a suitable recipe and this is the result.


First you have to chop up all the onions and the tomatoes, add a little salt, and then let it sit for 24 hours.

After that, it's a case of adding the rest of the ingredients and cooking it all down. I ended up halving the recipe amounts, just to make it tally with the amount of tomatoes I had, but I'm glad I did as I still ended up with about 5 jars and I think that's plenty for now, especially as it's an untried recipe!


I've tucked them away in a cupboard for now, but wondered if anyone knew what the best amount of time to leave them is before you start tucking in?

All info gratefully received!

Monday, 29 October 2012

I've Been At The Glue!

At last! I am back! Apologies for the delay. We actually took a bit of time off and if you follow my other blog at Scribbler Maxi, you will know from this post that we had a lovely week up in the Peak District and Yorkshire, exploring places like Chatsworth, the Bronte Parsonage and the rather fun and fabulous National Media Museum at Bradford. I would highly recommend the latter for passing time on a rainy day. There's a tonne of stuff to see and plenty of hands on things to keep both little, and big, kids amused.

I knew I wanted to keep some sort of journal for this trip. Let's face it - our first holiday since 2005, I think deserves some sort of celebration! :) I'd looked around online at the Smash Books but I had two problems with these; one, I thought they were kind of pricey and two, I wasn't sure if I was keen on all the designs in each book so in the end I decided to make my own version. That way I could choose the papers, knowing I liked them all.

As it turned out, the week before our trip got a bit hectic so I was, at one point, regretting not having ordered a book! In the end, I sat down and at half ten the night before we left, had the pages ready to go. I didn't have time to bind it, which meant that it wouldn't be accessible to drop in a bag but I could live with that.

 
 I had ordered a Smash pen which has a pen one end, and a glue stick the other. Here I made a boo boo - I chose the 'pink' version thinking it was just called that as it was supposed to go with the pink-bound book. Wrong! It has pink ink. Not what I had planned for. Oops! Anyway, I took it, along with another black ink fine writer, and a tape roller. I don't know if anyone else has had an issue with the glue on the Smash pens but my postcards were coming unstuck within a very short time so I am glad I had taken the extra tape roller as back up.

I had lovely time sticking in brochures, entrance tickets, receipts and postcards, and although I didn't always feel awake enough to journal at the end of the day, it was all done pretty close to the actual day.


When we got home, I cut the covers out of mountboard, covered it with some more paper, and washi tape and bound them with my Bind It All. I had an offcut of coil left and I actually prefer this look to having a full length binding in this case.
 
 
And I've no idea why this won't load the right way up...


Once it was all done, I found that I actually had some pages left over, so I didn't put them in the book and will just use them on some layouts.
 
I also printed a few photos and put some of them in there when we got home, but even this could be done 'on the road' if you have a mini printer, or are somewhere you could drop into an instant developer.
 
Hope you like it!


Tuesday, 11 September 2012

Making Soup, Sauce, and Grow Your Own

It's been a funny old year, weather wise. Certainly not the best summer for grow your own - whilst we didn't have the drought that they threatened us with, a situation which the media revelled in, conjuring up hype about how we would all be queueing with our buckets at the local stand pipe, it turned out to be rather the opposite!

There was plenty of water raining down from the sky. And whilst it wasn't reaching scorching temperatures all that often (something I for one, didn't mind), it wasn't exceptionally cold either. Which all led to a rather muggy, damp summer. Around this time last year, our garden was pretty much decimated as we had to replace the boundary wall. The plants against it were overgrown and out of hand and needed to be ripped out so we could get to the area to build. There was big brown, muddy patch on the lawn where we had stacked cuttings as we shuffled them bit by bit in the compost bin and to the tip. Once it was finished, the wall looked fantastic, but the garden looked a little bare and sorry for itself. We managed to save a couple of plants and I bought a few more, and got a couple of donations from my Dad in the form of some red hot pokers that hadn't performed well at all in his garden. As we have different soil, we thought we'd try them here. Although the smaller one didn't flower, the bigger one sent up 5 or 6 flower spikes over the season. In its previous home, it had only sent up one spindly one, so it seems quite happy where it is now.

When I look at the garden now, it's hard to believe it's only been in a year, some of it less. The amount of rain, combined with enough warmth to get shrubs going, if not annuals so much, has resulted in the plants putting on quite a lot of lush growth! So, there's an upside for some of us.

On the other hand, my Mediterranean veg haven't fared so well.


I was having a fight with caterpillars on my chilli plant and found that apparently, they like to sleep in the chillies! There was a little hole, just the one, on most of my chillies. They munch a doorway, crawl in and take a kip! Although I could cut that bit off, I didn't fancy eating something a caterpillar had taken a snooze in so I whizzed them into the compost. I don't use chemicals so I made up a concoction of mushed up garlic, some chilli powder and a squirt of washing up liquid, and mixed it all with some water. I then strained it and put it in a sprayer bottle. I squirted this a few times over the plant, and it seems to have done the trick. I've actually been able to pick some chillies for use now. The aubergine and pepper have been quite a disappointment. One on each plant. The aubergine did have another but it had grown right at the bottom and with so much rain, it started to rot where it touched the soil. Another time, perhaps some straw underneath might help.

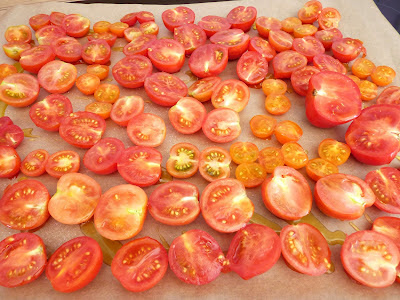
I also grew several tomato plants. We went back to more well known varieties this year after a disastrous outcome last year with 'natural', non hybrid seeds we'd sent for. Again, there's been a lot of lush and leafy growth and one of the Tigerellas got so big, it was wedged up with several stakes from the front as it had bent the large metal stake it was tied to! I've had a lot of pickings, and spent most of the day the other day making tomato soup. I tend to use Delia's tomato and basil soup from her Complete Cookery Course.


The book (available here at a great price). I also made 3 batches of tomato pasta sauce. My favourite recipe for this is Annabel Karmel's roast cherry tomato and mascarpone sauce here .

Both of these recipes call for the soup/sauce to be strained to get rid of any skins or pips at the end. After doing it the first time, I've never bothered with this step again. By the time it's all been blasted into oblivion with the food processor, it's fine with me if I get the odd tomato seed.

And as you can see from the picture, I don't stick to cherry tomatoes for the sauce recipe either. Whatever I have is whatever gets used. Still tastes just lovely!

Once again though, that damp humidity has had some affect on my plants. Blight appeared so I've had to get rid of a few of the plants and am just trying to get as many of the other fruit to ripen as I can, as I keep an eye on them and make sure it's not spread to any more. This is the second time I've had it on my tomatoes after years of not having it, but with the last two summer's we've had, it doesn't surprise me. And as Monty Don on Gardeners' World had his tomatoes attacked by it this year, it shows it's not just us amateurs who've had the problems.


Friday, 31 August 2012

New Sewing Machine Advice and Beautiful Old Ones

As some of you know, I've been 'between machines' now for some time, and whilst I'm having a nice time pondering on what I will make as and when I get a new one, I'm also finding that deciding on such a thing can be quite overwhelming. There's so much choice and so many different opinions. Who's right? Or is it all, as with so many things, just subjective?

I did have an interesting time a few weeks ago when I managed to rip the Brand New Dress I'd had on for about three hours! This is what comes of trying to carry too many bags of shopping down steps without lifting up the maxi dress a little.

I have to say, I am one of the clumsiest people I know, and am prone to tripping, banging into, or falling over so this was not really a new turn of events. What was new, (apart from the dress!) was that the fabric of the dress was quite fine which meant instead of me just falling up or down, as normally happens, I heard the most horrible tear. Looking down confirmed my fears.

Once I'd calmed down, I realised that at least this was fixable. The tear was at the bottom of the dress so turning it up an inch or so, should rectify the problem, and comforted myself in the fact that I hadn't put a great big hole in the middle at least! I say the problem was rectifiable. It would be if I had a machine.... Mum!!!

A little trip to my parents and I was soon sat opposite my Mum's machine which she got when she was 17...it's now over 50 years old. They certainly don't make them like this anymore. It's pretty just to look at!


Excuse the fact it's not the best quality pic in the world, but it was taken with a phone, in a north facing room. But it's still pretty!
 
It's the first time I've used a foot pedal in many years as my previous one had a start/stop button, so that took a bit of getting used to but after commandeering one of Dad's (clean!) hankies that was of a similar fine weave, I had a practice and got going. And I now have a wearable dress once again! It made me wonder what people who don't have a machine, or access to one, do when things like this happen. Or are they just not as accident prone as me?
 
In the meantime, I'm still pondering over what machine to go for. I tried out a Janome a few weeks ago, the TX607, and that was nice - I do love those little snippy scissor buttons! I wasn't so keen on the screen though. I didn't think it was as clear as some others, such as the 5900 (also Janome), although sadly this one doesn't have the thread cutter. I've been leaning towards Janome because I want something that I can get feet for easily if I want to, without having to send off and pay enormous postage, has a good range of fancy stitches as well as the workhorse ones, and basically will handle anything I throw at it - thick or thin.
 
If anyone has any opinions on the subject, I'm all ears! Thanks so much!


Sunday, 26 August 2012

Rampant Tomatoes!

I don't know about anyone else but I'm not having much luck with the chilli, aubergine or pepper plants I got this year.I only have one of each, which I'm now glad of but they've really been disappointing. I did have quite a few chillies but kept finding a single hole munched through each one. After some googling, I found out it was most likely caterpillars who seem to think that a chilli makes a nice sleeping bag!

I know that I'm going to be scraping out the inside as I don't use the seeds but even after washing them, the thought that a caterpillar had taken a kip in the chilli rather put me off eating them, so they got whizzed. I've grown them many times before and never had this problem so I'm not sure what the difference is. If anyone has any ideas, or has also been bothered by them, I'd love to hear. And whilst I know I could spray them, that's not how I garden so it's been a squirt of washing up liquid solution t try and get rid of the blighters.

The tomatoes on the other hand, after a bit of a slow start thanks to the rotten weather we had at the beginning of the season, have now romped away. So much so, in fact, that one has gone a bit rampant and collapsed onto the ground the other day, taking the steel support with it and putting a nice bend in it! It is now scaffolding up a bit - I was going to post a pic of this Heath Robinson solution but Blogger doesn't want to play tonight so I'll have to try again another day.

Suffice to say, I am now just hoping that we have enough warmth and sun to ripen the many fruits that are now on the plants. I had a tonne last year and then they just rotten on the vines. Having always been used to making enough soup and pasta sauce from my own tomatoes to last us through the winter previously, this was not a pleasant turn of events, as you can imagine. So fingers are crossed for this year.

But I have to say, the ones that have been picked so far have been delicious!

Wednesday, 1 August 2012

Grape and Apricot muffins

Continuing with the 60 Jubilee Bakes project, the latest creation is Grape and Apricot Muffins. Now, I have to admit, I wasn't entirely sure how these would turn out as this was a case of using up fruit that was starting to look a little soft and forlorn. So, I just took a basic muffn recipe, and bunged in the halved grapes and chopped apricot at the end, giving it just a few little turns with the spoon to make sure they were all nice and encompassed.


They turned out really well and went down a treat. I hate any food going to waste - which in this household, it doesn't usually get a chance to, but if things are beginning to look like they are thinking about going a bit squiffy, I will generally either a) make soup out of them if they are vegetables, and b) if it's fruit, then they're generally headed towards a tea loaf or some muffins. Give it a try!

We are actually getting a little rain tonight which is certainly welcome for the garden which is looking a bit parched. I'm hoping we'll get enough to fill the rain barrel up again but I've a feeling we're going to miss the main bulk of it. Still, something is better than nothing!

And for those of you wondering, I am still hoping to get back to adding sewing-type-entries at some point. I'm without a machine at the moment, as I think I've mentioned but that doesn't stop me planning! I've also got a few papercrafting ideas that I'm itching to try out so I'll be back soon with those!

Have fun in whatever crafty way you can!

ps - Go TeamGB!

Thursday, 26 July 2012

Baking Chocolate Chip Cookies

Choc chip cookies are rather a favourite of my hubby, and as I seem to have collected a few different recipes for them, I thought I would make a start on whittling them down to the best one.

This recipe is one I've had a while, and I think it was from Prima magazine originally. I have to say that the picture they showed was a lot more brown and chocolately looking than mine, even though I followed the recipe to the letter.

Apologies - I cannot find a way to make this picture go upright on this post.
Hopefully you still get the idea!

As you can see, mine were just a normal colour rather than the deep chocolately brown shown in the magazine picture. So, not sure what went on there. They aren't the traditional sort of flat cookies like you might buy in a bag in a supermarket - these are more like a cross between a cake and a biscuit. And, by the way, they were a hit!

Does anyone have a favourite choc chip cookie recipe - and why is it your favourite? I'd love to hear from you!

Thursday, 19 July 2012

Carrot Cake - Delia Smith Style

I often wonder how the first carrot cake came about. I mean, it's not the first ingredient that comes to mind when you think about a baking a cake. I've also made courgette cake and thought the same sort of thing.

There was a particular recipe I used to use which involved separating the eggs, and folding in the whisked egg whites to the main mixture. It resulted in a very yummy cake, but it was a bit fiddly. So when I came across a recipe called Caroline's Carrot Cake in Delia Smith's Book of Cakes, I thought I'd give it a whirl.

I've made it a tonne of times since and I have to say it's been a total hit. There's no separating of the eggs, and it's one of the few carrot cakes that doesn't involve a cream cheese topping. I have to say that I actually like that sort of topping but it's not the most portable. Put a slice of that in a lunchbox and you tend to find there's more icing around the inside of the box than on the top of the cake.

Carrot Cake and Blueberry Muffins

The topping of this one is made with orange juice, which is left to soak into the cake once it comes out of the oven. This makes much more of a portable cake, if you're thinking of making it for lunchboxes or picnics. I've also made it without putting on any sort of topping and no complaints so far!

Do you have a favourite recipe for this old favourite? I'd love to hear!

I'm certainly a Delia fan amd have made a lot of cakes from this book, it's definitely one of my favourites, and I'd highly recommend it (Amazon have it here)

Sunday, 8 July 2012

Blueberry muffins

Another of the recipes to add to the Jubilee Baking Project pile is blueberry muffins. This particular recipe is adapted from the Summer Fruit Muffins recipe in Susan Reimer's book 'Muffins - Fast and Fantastic'. I've had this book for years, and it gets used a LOT! You can our favourite recipes by which pages are the muckiest! My copy looks like this but it looks like there's a snazzier version with pictures also available now. It's a book I highly recommend.


Needless to say, they didn't last long!


Monday, 2 July 2012

Bad Blogger!

I know, I know. I am a Bad Blogger! There's been rather more of a gap between posts on both this, and my writing blog (http://www.scribblermaxi.blogspot.com/). Life got a bit hectic (well, more hectic than usual) and this combined with some under-the-weather scenarios on my part, and a poorly laptop hasn't done well for my blogging.

So, please accept my apologies and I do promise to do better (I feel like I should be doing a Girl Guide salute, even though I only made it as far as Brownies, but I seem to think that the Promise was the same... I promise to do my best...).

I have been undertaking various baking adventures, so have some more pics of the results to upload. The tomatoes are coming on apace in the garden, although some flippin' Summer Type Weather wouldn't go amiss if any of the Weather Gods are reading this.

Sewing has been a little sparse lately due to me being 'between machines'. I have a shortlist of ones I want to try before I invest, but it's finding time to do that (and waiting for deals!) so in the meantime, I have been pondering on whether to get the prep work done on a bunch of various projects so that as and when a new machine is welcomed into the fold, I can just get whizzing. I mean, the cutting out is really the tedious bit, isn't it? Anyone have any other ideas how I can keep the creative sewing juices going until I can actually sew?

Thanks again for sticking round, and I'll be posting again shortly. And don't forget to let me know about those good ideas!

Tuesday, 12 June 2012

Olive and Rosemary bread

In between all the downpours, I've been diving outside, trying to tidy and sort out the garden a bit. Whilst like many gardeners I was hoping for a bit of rain to help the plant life, I think the continuous rain joke is now wearing a bit thin! I put a couple of Mediterranean veggies into pots the other day but unless we get some sun soon, their hopes of a strong future are looking a bit limited!

With the poor weather in mind, I thought I'd bring a bit of the Continent into the kitchen and this morning baked Olive and Rosemary bread.

Tuesday, 15 May 2012

More Jubiliee Baking - White Farmhouse Tin loaf

Another recipe from Dan Lepard's 'Short & Sweet' book. This loaf uses what he calls the 'half sponge' method. You can start off the yeasty bit hours before you need to do the rest so it's a good one to do if you have to go out or you could do it the night before.


There's definitely more work in this one than the Easy White Loaf I did here but it's still not hard. I did mix up the dough when it came to it in my Magimix to save a bit of time because I'm not keen on the whole rubbing in method. That phrase just always takes me back to school Home Economics lessons!

Having said that, it still wasn't difficult, just a bit more fiddly than the other one. Taste wise, we weren't able to tell the difference between the two. Just because the Farmhouse loaf has fat in it, I imagine that one would keep a little longer - but that doesn't seem to be a problem we are having! The loaves are only small anyway so never really get a chance to go stale, as you can see from the fact I had to photograph the last few slices before they too disappeared!

All in all, another good recipe from this book. I'm eager to try the Cheese and Chive version of this one soon.

Friday, 11 May 2012

Nostalgia Baking

One of the things I remember baking at home when I was little was butterfly cakes. You know the ones, where you chop off the top, fill the dent with butter icing and stick in the 'wings' made from the divided cake top.

Feeling a bit off colour the other day, I was reduced to daytime television. This is not a good thing in general so I went channel hopping to find something a bit more enlightening to watch and came across one of the food channels showing Mary Berry baking cakes. I missed the whole Great British Baking programme but hers is a name I remember from my childhood too. So I sat happily ensconced watching some delightfully nostalgic baking.

When I felt better, I took that a little further and made some of my own butterfly cakes. Something I haven't done for many, many years!


Happy memories :)

Wednesday, 9 May 2012

Banana Cake Fail

I'd love to know if anyone else has tried the 'no fail' banana cake from Kirstie Allsop's most recent book 'Craft'. I wouldn't say I'm an expert by any means but I can generally make cakes ok. But somehow, I managed to get this apparently super reliable cake to flop.

Abandon ship! We're sinking!

When I put it in the oven, it had a sort of 'souffle' type texture to it which was fine - my favourite pudding has the same type of texture and that comes out great (ok, now I'm wanting to make that...yum yum yum) but as soon as this came out  it just started sinking and didn't stop! Despite being a recipe for a 2lb loaf tin, four bananas are called for. This seemed quite a lot, and more than other banana cake recipes I've used (which have all worked) call for. I do wonder if it's a bit much for that size cake.

Either way, I can't say it's something I'll be trying again. I'll stick to previous ones I've made that I know work but I'd love to hear if anyone else has had success with this recipe or if it's just me.

Monday, 7 May 2012

Lavender Heart Stuffies

I don't know if any of you subscribe to or buy 'Sew' magazine. I've been a subscriber for quite a while now but the last couple of months have left me disappointed. It seems to be going over to more craft than dressmaking. I love sewing craft as much as the next person, but that's not why I subscribe to what is a fairly expensive magazine. For instance, last month's was a Patchwork Special.

I'm all for reading, and trying new techniques but I don't really want a whole magazine devoted to it, when I buy that magazine for its original subject, ie, dressmaking. What also bothered me with last month's was that there was no 'proper' pattern. Sew's big draw is that it always includes a dressmakers' pattern, quite often Simplicity. This works well for me as they are usually patterns I'd like to try so that addition helps justify the subscription (as it's not the cheapest mag on the market). I like that it is modern, and looks at fashion as well as dressmaking. At least it used to.

Last month's pattern was for an apron (not exactly a shortage of these around), and a little girl's dress. Both are sweet, and both have to be downloaded. The thought of sitting there printing out bits of pattern that I need to use both time and ink up on as I churn it out and then try and work out what goes where does not fill me with glee. So far I haven't bothered.

Anyway, I'm hoping for a return to its roots for Sew very soon.

Along with the 'free download' offered last month was a pack of a few patchwork squares of fabric. I wasn't inspired at all by the projects shown in the mag so washed and ironed the pieces and put them away. Yesterday I felt like a play so ended up making these:


I drew a heart shape freehand and cut out eight larger size hearts, then drew around a biscuit cutter to make the smaller ones for the applique. I spray tacked the little one on the fronts and zig zagged around to hold it on then sewed two big ones together, sandwiching a little piece of grosgrain ribbon inside so that there would be a hanger for it. I tried it with some thicker ribbon to start but it was really hard to get it to hang right, so I unpicked and went with the thinner one. I then stuffed them with a mixture of pillow stuffing (quite literally from a pillow) and dried lavender.

I think they came out ok for a little bit of playing and for some fabric that I wasn't terribly inspired by to start with. I'm keeping the first one (which is a bit wonky!) and then giving away the rest. Yet another project to help me get used to my new machine.

I hope you like them and would love to hear your views on Sew if that's a magazine you read!

Friday, 27 April 2012

Citrus Bake

Onward with the Jubilee Baking Project and today's post will be short and sweet because it's past my bedtime quite honestly, but I wanted to catch you up with a recent baking creation.


This recipe was one that had been in my 'To Try' file for many years, and I just hadn't got around to making it. Mostly because I don't always have clementines in the house, which this cake requires. However, thanks to a friendly offer from the supermarket, and an attempt to get more Vitamin C, I'd stocked up on the aforementioned fruit. So, when I was flicking through, deciding on what to try next, this one was ideal.

The recipe was cut out from a magazine, and was so long ago now, I couldn't tell you which, or even begin to guess.

The cake is made with clementine zest as well as lemon and lime juice, and then the topping is basically a buttercream made with clementine flavoured sugar (bung the sugar in the food processor, add the clementine peel and press go!). The overall verdict was a 'probably not make again' in the end, which is quite unusual in this house, especially when it comes to cakes and goodies. It just wasn't special enough to go into the 'Yum' file for us. Having said that, it did of course all get eaten!

We shall see what verdict the next creation brings!

Thursday, 12 April 2012

Homemade Hot Pad

As I mentioned in my previous post, I finally got to do a bit of sewing the other day too in between preparing my home made bread.

Now I'm sure for most people, a hot pad (or trivet, or whatever else you want to call it) is something they whizz up in half an hour. It took me a lot longer than that but I'm not stressing about that. I am actually over the moon with the result and know that I'm actually going to enjoy using it, and smile when I grab it and that's the important thing for me.

Fruity!

A certain amount of the time was taken up with hand stitching the back of the binding on. I did try to do it from the front using the old 'stitch in the ditch' routine, but it just wasn't happening. The 'wadding' I used is that sort of rubbery heat protective stuff that you buy on a roll, rather than batting, so a bit less flexible than regular stuffing. I was keen to use this because I have new worktops and was worried about not putting enough protection in and ruining lovely tops that I have seriously waited twenty years and several houses for!

I also realise that I probably should have quilted it at diagonals rather than straight lines but there we go. This was kind of a two pronged project - making something useful for the kitchen that I needed, and helping get used to a machine that I upgraded to a couple of months ago and still haven't had much time to play with.

All in, I was pretty chuffed. I have a terrible habit of making things and then not being pleased with them and they end up donated in various directions. This, I am totally happy with. I love the cheery Alexander Henry fabric that I bought half a metre of a couple of years ago. I had no idea what to do with it and couldn't afford a whole metre but just had to have some! I'm thinking of making my mum in law one for her kitchen too now.

Hope you like my little project! Please feel free to leave a comment...if there's anyone out there :)

x

Tuesday, 10 April 2012

More baking!

I was having a bit of a Domestic Goddess moment yesterday (well, in actions if nothing else!) and as a result, have made another addition to the Jubilee Baking Project.

Yum!

As you can see, a little bit has already disappeared so I thought I'd better photograph it before the rest went. Well, you have to test these things, don't you?

In the previous post, I mentioned that an earlier attempt at bread making many years ago resulted in cannonballs, rather than bread rolls and it rather put me off trying again. We don't eat a tonne of bread but we do need it for sandwiches, etc, and it's a little worrying when you read about all the extra ingredients that go into a simple loaf of bread like preservatives and so on. Not having much success with my bread making attempt before, I'd been pondering on investing in a bread maker.

In the meantime, I saw the new(ish) book by Dan Lepard, called 'Short and Sweet'. I have to say I've no previous experience with his recipes and this was the first I'd heard of him. Looking up the reviews though, I found out that he writes a baking column for the Guardian newspaper, and that people were pretty thrilled with his recipes. One of the recipes was for Easy White Bread.


Thanks to some vouchers, I was soon the owner of a copy. This is something in itself. I have plenty of cookbooks and stopped buying them some time ago because there are so many recipes online, and you often only end up making a few out of the book. But this one had such good reviews, I decided to go for it, with the bread recipes a major factor in that decision.

Easy White Bread is the first recipe in the book, and also the first one I've tried out of it. And it worked! Yippee! I made bread! I made edible bread! Thank you, Dan!

I was also playing with the sewing machine yesterday, so I'll update you on that shortly.

Anyone else got this book, and if so, do you have any favourite recipes from it yet?


Saturday, 7 April 2012

Jubilee Baking Project!

I've been thinking about doing some sort of project for my crafty blog but couldn't decide what to do. I really admire people who are able to whizz up sewing projects with superb speed and ease, but I'm not that quick at sewing (although I'm really hoping to get a bit more speedy with practice!).

So, in light of this, I thought a baking focus might be good. I also really wanted to tie it in with the Jubilee celebrations somehow. Not being of a particular sporty nature, the Olympics aren't really a great cause of excitement for me. The Queen's Diamond Jubilee on the other hand is more of an interest, and so it's with that in mind I came up with my plan; to create 60 baked goodies within the Jubilee Year. (Having said that, I'm never exactly sure when the 'year of celebration' starts and finishes. Is it just 2012?)

I did think of just doing baked goodies, as in cakes, etc but I really wanted a bit more of a broader scope than that so, with luck, I'm going to also attempt some breads. My hope is that these turn out better than my last attempt many years ago. I attempted to make bread rolls but at some point in the process they morphed into cannonballs. It rather put me off, but having recently got a new baking book, the bread recipe from which everyone is raving about, I thought I might have another go. Stay tuned for the results...good or bad! (please be good, please be good!)

In the meantime, this afternoon I made brownies with a yummy crumbly fudge topping. I am ashamed to admit that two (small!) pieces have already fallen onto my plate during the evening...


This recipe was taken from Prima magazine.

Anyone else doing any special projects for the Jubilee year? I'd love to hear!

Sunday, 1 April 2012

Just For You card

I've been having a papercrafting moment today. It's been a while but I really enjoyed it. Firstly I spent some time doing a scrapbook page. Whilst I was putting it away, I realised it was probably more than two years since I did an actual page. I've done a couple of mini books in the meantime, but no actual pages. The main 'ingredients' for the page have been sat on my desk for a while but it was finding the time to actually put it together. But now it's done. I really must try and do some more!

Once I was done with that, I thought I'd make a card...


I got the idea for this card from one of Shimelle's classes, 'Pretty Paper Party' that she ran last year. It's all made out of scraps, which is even better. I hope you like it.

If you took the class, and have made a version of this card, I'd love to see it!


Monday, 19 March 2012

Upside Down!

Just a quick note to apologise for the lack of postings on here lately. Life has been a bit of a rollercoaster lately, to put it mildly. We've also been doing some more work on the house, and as I'm sure you all know, when you start work on one room, all the others tend to get in a mess and fill up with stuff! Consequently, my craft stuff, sewing machine and other goodies are all pretty much buried at the moment.

I've also been concentrating on my writing for a couple of competitions. One is pretty much ready for submission now, and I'm hoping to get the other one done before the closing date. We shall see.

I certainly have plenty of ideas for craft and cooking, so I'm really hoping to get the chance to dive into them before too long and start sharing.

Sunday, 26 February 2012

Patchwork

I am the first to admit that I am not the most patient of crafters. I like to see things come together quite quickly. Instant gratification is pleasing to me :)

It is with the utmost respect then that I look at those who do intricate cross stitch and patchwork and know that I am unlikely to ever have either the skills or patience to do either, and make sure a wonderful job of it as they do. With that in mind, please don't judge me too harshly on my latest endeavour.

A little while ago I got a new sewing machine, but to date I've not had the chance to use it much thanks to catching pretty much every bug going since the New Year. It's a little more techy than my previous model and not generally being all that good with technology, I have to say I'm a little intimidated. I do know that the best way to learn and lose that fear is just to plunge in.

So, with this in mind, I went rummaging when I had some spare time and found a bunch of pre cut patchwork squares I'd got off Ebay a couple of years ago. I fiddled about, laying them out into a pleasing arrangement and started sewing.


I did my best to keep the edges together but it seems that some still went a bit askew. I think this is due to a bit of fraying having taken place on some of the squares which made them a bit smaller, but I'm sure a little is also down to me too.


All, in all though, I'm fairly happy with how it turned out. I like the pattern certainly. I haven't decided exactly what to do with it yet. There is a possibility of building on it with other fabric, and making it into a quilt or something, but I'm not sure where I'd put it right now, or perhaps a cushion front. The other idea that came to me this morning was making it into some oven gloves by cutting the shapes out of the made up fabric but I'm not sure there's going to be enough, certainly not for both sides but I could do one side plain. That would give me a chance to do some freehand quilting (bearing in mind my lines are straight enough to do plain quilting!). I'm not sure yet.

If anyone else has any ideas, I'd love to hear them!


Sunday, 12 February 2012

I haven't forgotten you!

Sorry I haven't posted for a while. It's just been (and is) one of those times lately. I haven't even got to crafting at all, unless you count sorting out my sewing patterns which I have pretty much done. I've photographed all the covers now and have printed some out. But now we're out of ink so I can't do the rest yet. Then I'll have my own little catalogue. Ideally, I'd like to make a list of the pattern numbers I have too but whether I'll actually get to that, I'm not sure.

I have picked out what I'm hoping to make next, which is from this book


It's call the 'Flouncy Bag'. I was looking at the instructions last night and I noticed that it asks for fabric that's non directional. The piece of stash I had in mind is an Amy Butler bit I got on sale ages ago but looking at it this morning, it does have a direction really. I'm wondering if anyone else has made this bag, and if so, how important the direction statement is in this case. From the cutting layout, it didn't really look like it would matter too much.

I'd love to hear your feedback if you've made it, and what you thought.

Thanks and look forward to hearing from you!


Sunday, 22 January 2012

Vintage Liberty

One of my plans this year is to sew a lot more. Included in those plans is to find something to make out of these fabrics. 

Fabrics!

They are all vintage Liberty fabrics. My nan was a seamstress and these were some of hers. My favourite is the white and blue and I think it will make a pretty skirt. I'm thinking perhaps a dress for the flowery one on the left as there's quite a lot of that.

My main thing is that I don't want to muck up! The fabrics are obviously special not just because they are Liberty (something I couldn't ordinarily afford!) but because they came from my Nan who got me into the whole sewing thing in the first place.

Have you ever had fabric that you are too worried to actually cut into? And if so, what did you do? (or is it still sat in your stash getting stroked every now and then?)

I'm on a bit of an organisation kick at the moment, which when I get to that bit, will include sorting out my patterns. I'm taking photos of the envelopes and am going to make up my own 'catalogue'. It's a fairly large job but I think it will be useful. Especially as I came home with the same blouse pattern as one I already had last year! I suppose at least it shows I was right to buy it in the first place, as I then bought it again later!

In the meantime, I've been finishing up my Journal Your Christmas album, which is finally nearly done. I've learnt a lot of things from this one that I would put into action if I did it again and which would hopefully mean I wasn't still doing it in the middle of January! Once I put the final touches on, I'll share some piccies.

I've also been sorting out my scrapbook layouts. Years ago I bought some American Crafts 12x12 ring binder style albums. I have just this morning got around to putting my layouts into them, having taken them from the post bound albums they were living in. Of course, I don't have enough page protectors, so they're not all in there quite yet, but that's the plan.

I'm putting everything into date order of when the photo was taken. I know some people don't like to do that because it means that obvious scrapping style changes show up as you flick through but I'm ok with that. It doesn't bother me. I'd rather have the photos in a more chronological order because I think it becomes more of a life story that way. But that's just my preference. It just would have been helpful if all the original page protectors from the other albums had fitted the new ones, but that would be too easy wouldn't it?


Monday, 2 January 2012

Get ahead, Get a Hat!

I'm quite a 'hat' person. I don't own loads but I do like them. I'd been looking about at the 'Baker Boy' style caps around as I like the style but they're not cheap, especially for something you're not exactly going to get a tonne of wear out of. So, I pondered on making my own, found a pattern and here's the result.


I don't have a 'head dummy' to show it on but managed to find a very patient model instead :)  The pattern came from a magazine and was pretty good, apart from at the end when it told you that if you wanted to put elastic at the back (to make it a little smaller), it's supposed to be put on before you turn the band lining in. At least that's how it seems. I'm just going to see how it feels when I wear it. If I want to make it a bit smaller then, I'll just have to put a bit of elastic on the inside of the band at the back. No-one will see it when it's on my head anyway.

The fabric I used is a thin denim, recycled from a pair of jeans that I made into shorts for my friend. I had the extra leg bits left and it was just enough to make the hat from.


I had to make a self cover button which was a first but I don't think it went too badly, considering. I did try it with other buttons I had to see how a contrast would look but nothing suited it so I stuck with the suggestion for a self covered one.


The lining is some cotton from a remnant someone gave me a couple of years ago. I thought that it went with the whole 'vintage-y' feel of the cap's style.

So all in all, the make didn't cost me very much at all; a bit of tie back interfacing was the only thing I actually had to get for it, the rest was just stuff I had in my stash!

Hope you like it! Please feel free to leave a comment :)

Sunday, 1 January 2012

Happy New Year!

2012 indeed! I don't know about you but the last year has gone so fast. I'm sure the last time I looked it was only June!

I'm not really one for resolutions - I have an allergy to planning - but there are things I'd like to do, if I can in the craft department. Mainly these are to improve my skills. I'm especially keen to regain some of the knowledge I've lost of sewing, or perhaps that should be confidence I've lost in sewing. I think when you don't do something for a long time, you lose your belief that you can do it a bit, don't you? So I'm trying to get that back. I know it will take time but hopefully I'll get there. A case of trial and error, although it would be nice if there aren't too many errors!

I also have plans to set up an Etsy shop too, just to see. I've got a Folksy one but I thought I'd go global :)

I'd love to hear what plans you have for your crafting, so please feel free to leave a comment below.

Happy Crafting New Year!